- Published on
Quickstart Guide to VerifyML (Pt 2)
- Authors
- Name
- Jason Ho
- @CylynxTweets


Photo by Hans Reniers on Unsplash
This is part 2 of our guide to using VerifyML, one of the winning submissions for the Monetary Authority of Singapore’s (MAS) Global Veritas Challenge. If you haven’t already, read our previous articles here:
- Introducing VerifyML
- A Quickstart Guide to VerifyML (Pt 1), which described the creation of a simple Model Card
In this post, you’ll learn how to use VerifyML’s fairness tests to check for unintended biases in your model, and even create your own tests if they don’t fit your needs out-of-the-box. API documentation is also available on our docs, so do check that out as well!
Basic Usage
A sample notebook for this section can be found here.
Define requirements
When using VerifyML, the first step is to define requirements and specify the desired fairness criteria for our model, so let’s do that.
For this example, we’ll assume we have a fraud detection model that predicts whether credit card transactions are fraudulent (1) or not (0). In addition, we want to ensure fairness in this model’s results by setting a criterion that false positive rate (FPR) across all age groups are similar.
(If you need some help with choosing criteria for your own projects, our introductory post discusses various fairness philosophies and their attendant considerations — take a look and see if they work for you!)
Prepare data and predictions
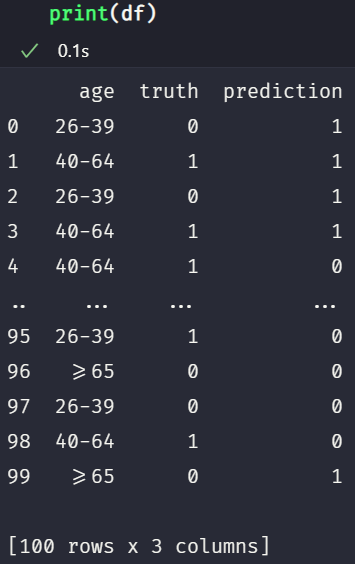
Then, we’ll create a random dataset to represent the output of the model’s predictions. For simplicity, it will only have three columns:
age: the different age groupstruth: whether the transaction was actually fraudulent or notprediction: whether the model predicted the transaction to be fraudulent or not
To do this, use the following snippet in your notebook:
import pandas as pd
import numpy as np

# define some constants
NUM_ROWS = 100
AGE_GROUPS = ['26-39', '40-64', '>=65']

# set a seed to get the same set of randomly-generated data every time
np.random.seed(0)

# create the dataframe and insert the columns
df = pd.DataFrame()
df['age'] = np.random.choice(AGE_GROUPS, NUM_ROWS)
df['truth'] = np.random.randint(2, size=NUM_ROWS)
df['prediction'] = np.random.randint(2, size=NUM_ROWS)
This creates a DataFrame with 100 rows and 3 columns. Some notes:
np.random.seed(0)is optional — it just ensures that your randomly-generated data will be the same as what’s shown in this exercise- For the
truthandpredictioncolumns, the first argument tonp.random.randintis2, indicating that it should generate a random integer between 0 inclusive and 2 exclusive (i.e. 0 to 1)
If you open a new notebook cell and run df or print(df) in it, your data should look like this, assuming you used the same seed:
Choose a test
The next step is to choose a suitable VerifyML model test that captures our selected fairness criteria i.e. similar FPRs across age groups. In this case, we’ll use the SubgroupDisparity test (source code, docs), which does the following:
For a given metric, assert that the difference between the best and worst performing group is less than a specified threshold.
Sounds like what we need! Let’s import and instantiate it:
from verifyml.model_tests.FEAT import SubgroupDisparity
sgd_test = SubgroupDisparity(
  attr='age',
  metric='fpr',
  method='ratio',
  threshold=2
)
In summary, this test expects the pairwise FPR ratios between all age groups to be less than 2.
attr: The protected attribute / attribute of interest —agein this case. Because there are 3 unique age groups (26–39,40–64,≥65), there will be3 choose 2 = 3pairwise comparisons made heremetric: The metric that’s compared across the groups —fprfor false positive ratemethod: The method used to compare differences inmetricacross the different groups —ratioimplies we are comparing percentage differences, instead of absolute onesthreshold: The maximum acceptable difference across the groups — because we specifiedmethod=ratio, this means themetricratio between any two groups cannot be greater than 2
Test the data
After choosing and creating a test, we can apply it to our data with just one line:
sgd_test.run(df)
Let’s see if it passed the test using the .result and .passed attributes:
sgd_test.passed
sgd_test.result
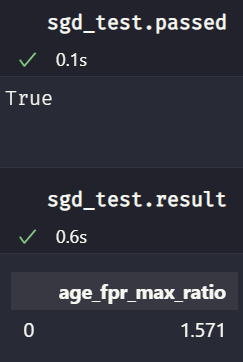
Run these commands in separate cells to see the results more clearly
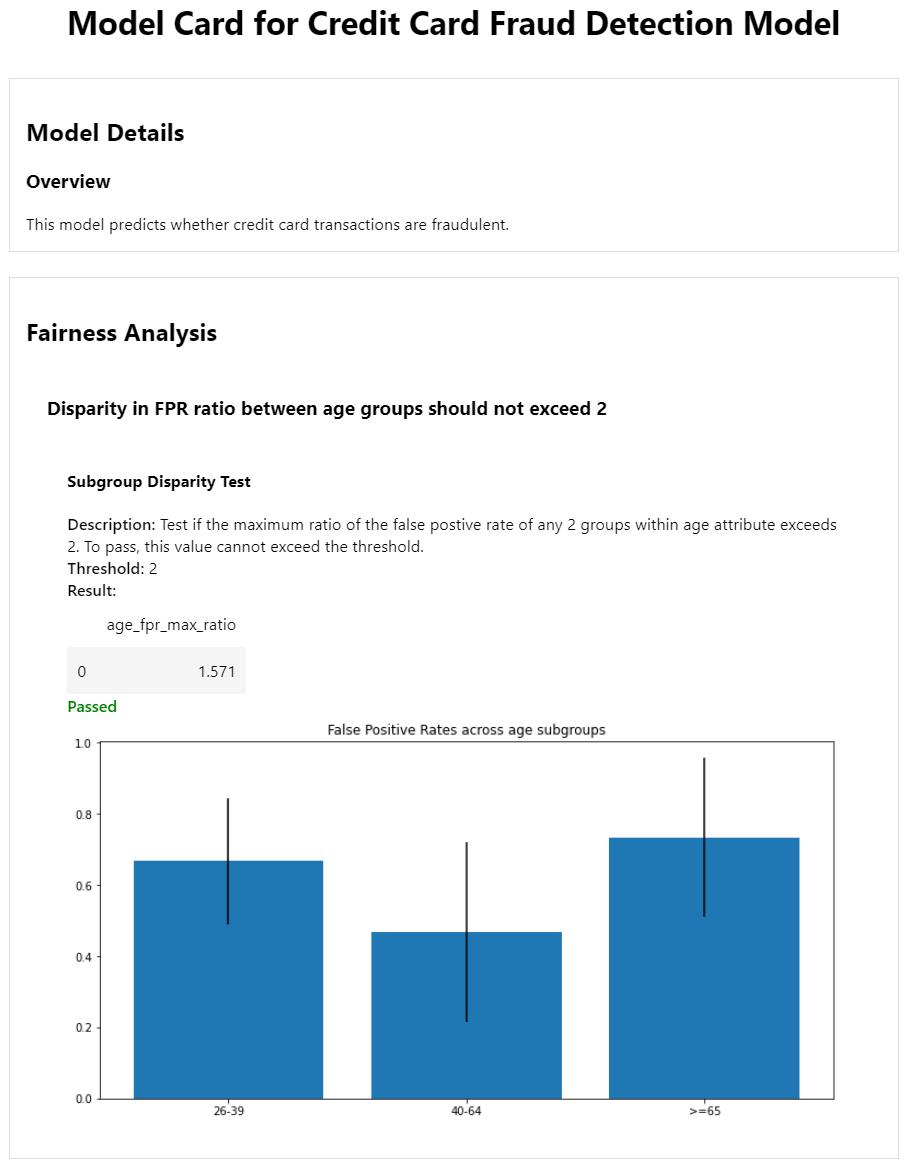
Seems like it! Since the maximum FPR ratio of 1.571 does not exceed our threshold of 2, .passed is True.
Psh… That was too easy…
Indeed, a threshold of 2 might be too lax for our refined sensibilities, so let’s be stricter about what constitutes fairness — with a shiny new threshold of 1.57.
sgd_test_strict = SubgroupDisparity(
  attr='age',
  metric='fpr',
  method='ratio',
  threshold=1.57
)
As you might expect, our model predictions no longer pass the test if the threshold is changed:
sgd_test_strict.passed
sgd_test_strict.result
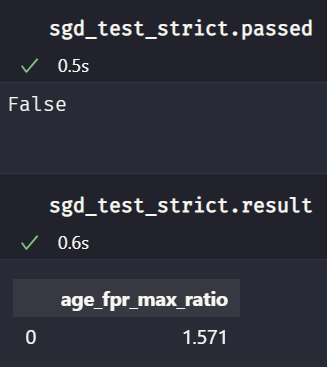
As shown, with a simple change to the arguments, the tests can be easily tweaked to our preferences!
Refer to the docs for a more details about the arguments and their possible values.
Plot the test results
For most of the provided tests, we can also plot the results to get a clearer picture of why a test passed / failed. To do that, run
sgd_test.plot()
Which should return this:
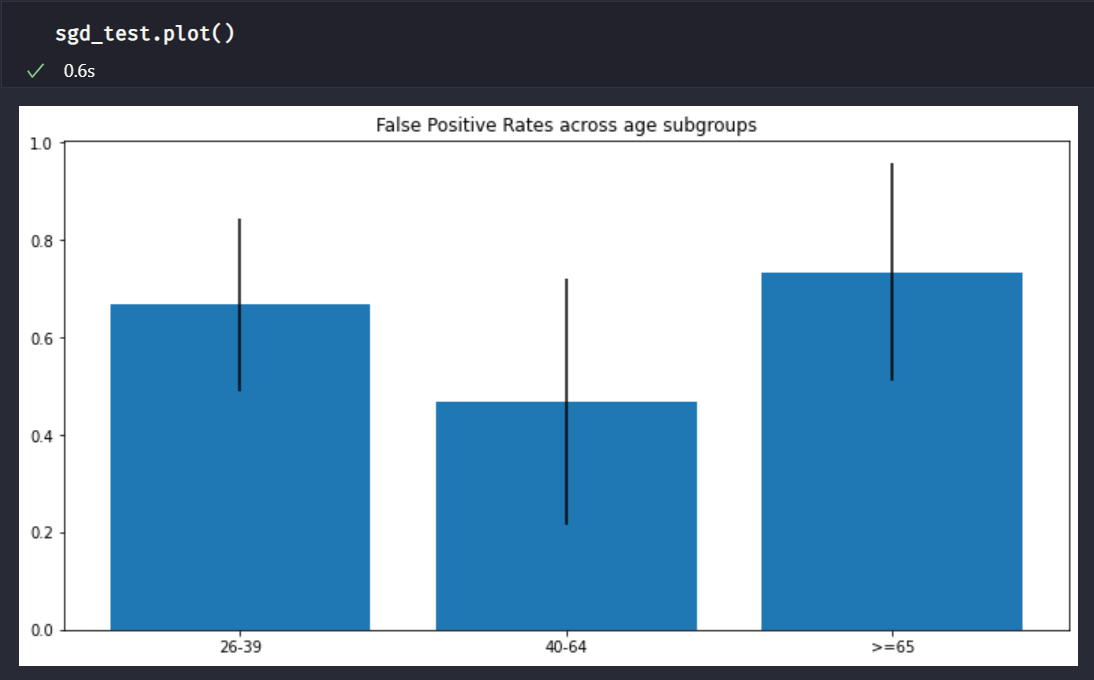 By default, the 95% confidence intervals are also plotted
The actual FPR values for each group are not visible, but because we know that the test result was age_fpr_max_ratio=1.571, we can infer that the ratio between the tallest bar (>=65 group) and the shortest bar (40-64 group) is 1.571.
Put the test on a Model Card
After running our tests, we can put them on a Model Card. We can create a minimal card like this:
import verifyml.model_card_toolkit as mctlib

mct = mctlib.ModelCardToolkit(
  output_dir='model_card_output',
  file_name='first_model_card'
)

# init model card assets using the toolkit
model_card = mct.scaffold_assets()
model_card.model_details.name = 'Credit Card Fraud Detection Model'
Refer to Part 1 of this guide if you need to revisit how these lines work.
After that, we’ll create a fairness report and attach it to the card:
# a model-card-compatible test object
mc_sgd_test = mctlib.Test().read_model_test(sgd_test)

# a fairness report
report = mctlib.FairnessReport(
    type="Disparity in FPR ratio between age groups should not exceed 2",
    tests=[mc_sgd_test]
)

# attach the report to the model card
model_card.fairness_analysis.fairness_reports = [report]

# update card with changes
mct.update_model_card(model_card)
Finally, we’ll render the model card in the notebook:
from IPython.display import HTML

html = mct.export_format(output_file='first_model_card.html')

# display the HTML in the notebook
HTML(html)
And that’s it! Simple, right?
Although we’ve only used the SubgroupDisparity test in this example, there are several more to choose from, so be sure to check those out as well. They all have similar usage patterns to what you’ve seen above.
But what if all of those tests still don’t quite hit the spot? That’s where the next part comes in.
Rolling Your Own Tests
If you need some custom logic to evaluate the fairness of your ML models, it’s also easy to create your own Model Tests by extending the base class. We’ll discuss that in this section.
Anatomy of a Model Test
VerifyML’s base ModelTest (source code, API docs) is just a simple Python abstract class with two attributes:
result: stores the result value of a given test (e.g. the number of false positives)passed: a boolean that indicates ifresultmet a certain defined criteria (e.g. whetherresultis lower than 10)
And one abstract method:
run(): contains the logic specific to a test, and updatesresultandpassedwhen called
All Model Test subclasses follow this basic structure, and they are required to have two additional class attributes: test_name and test_desc. Apart from that, extra attributes and methods can be added according to the complexity of the test.
Example
To demonstrate, let’s create a very basic Model Test — one that accepts a string, and passes only if the string’s length exceeds a defined threshold. It’d be as simple as this:
from dataclasses import dataclass
from verifyml.model_tests.ModelTest import ModelTest

@dataclass
class StringLength(ModelTest):
    """Tests if a given string's length exceeds a threshold. Pass if true, else fail. """
    string: str
    threshold: int = 5
    test_name: str = "String Length Test"
    test_desc: str = "Tests if a given string's length exceeds a defined threshold."

def run(self):
    self.result = self.string
    self.passed = True if len(self.result) >= self.threshold else False

return self.passed
And if we run it:
sl_test = StringLength('foo')
sl_test.run()
sl_test
We should get this, indicating the test failed:
StringLength(result=3, passed=False, string='foo', test_name='String Length Test', test_desc="Tests if a given string's length exceeds a defined threshold.")
We see that it passes when using a longer string:
sl_test_longer = StringLength('foobar')
sl_test_longer.run()
sl_test_longer

# returns StringLength(result='foobar', passed=True, string='foobar', threshold=5, test_name='String Length Test', test_desc="Tests if a given string's length exceeds a defined threshold.")
Or when using the original string with a lower threshold:
sl_test_3 = StringLength('foo', threshold=3)
sl_test_3.run()
sl_test_3

# returns StringLength(result='foo', passed=True, string='foo', threshold=3, test_name='String Length Test', test_desc="Tests if a given string's length exceeds a defined threshold.")
If we follow the steps previously discussed in the “Put the test on a Model Card” section above, this would be how the test renders on a (rather sparse) Model Card:
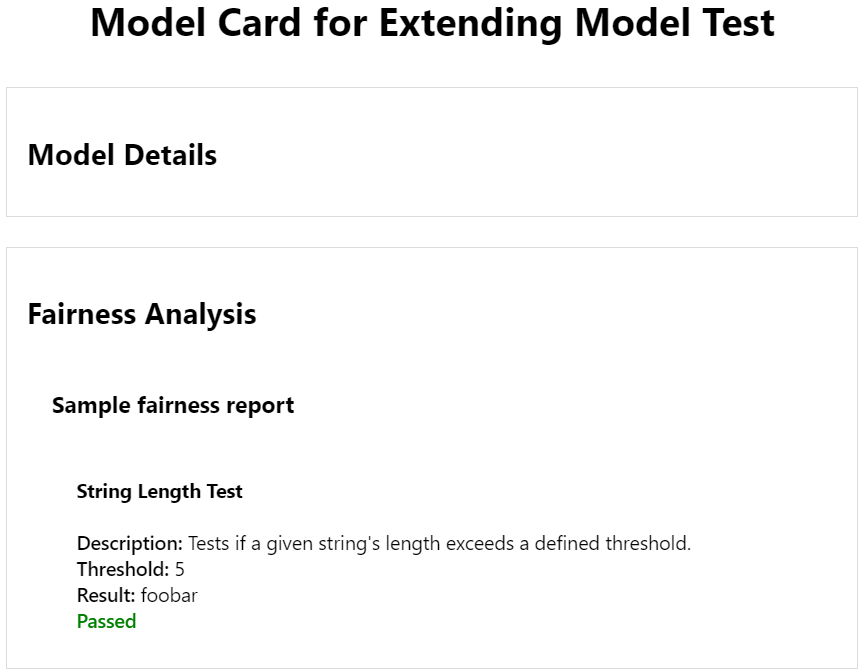
Note how the test_name, test_desc, threshold, result, passed attributes are all rendered
And we’re done! As we’ve seen, if none of the provided tests fit your use case well, you can easily create your very own Model Test to suits your project’s needs.
Conclusion
Congratulations on making it this far! 🎉 In this guide, you’ve learnt how to:
- Define your own fairness criteria
- Choose or create a Model Test to represent your criteria
- Apply the test to your model’s predictions
- Revise model / thresholds as needed
- Render the results in a Model Card
With this, you’re now equipped to incorporate responsible AI workflows in your team — go ahead, try it out and let us know how it goes! If you have any questions / ideas / suggestions, feel free to reach out either through our GitHub repo, contact form, or via email at hello@cylynx.io 🙂